Preparing Your Placement File
When placing your accounts with Simon’s, we aim to make the process as easy and error free as possible. For clients using their own software (such as: Athena, Epic, Medent, Centricity or Zoll Data Systems) exporting and transferring your data to Simon’s is very easy and we offer direct support between your IT department and ours. We can even support exports from your own proprietary system or any number of systems you may be using. As part of this process we also offer an encrypted online “pipe” (SFTP) for easy file transfer to Simons. Again, Simon’s IT and Client Services departments are here to support you at every step.
For clients who are producing manual exports or simply want to type out their account information (or copy and paste from their own records), Simon’s offers a spreadsheet template that you can use to accomplish this. If spreadsheets are unfamiliar to you, you may find this basic introductory video helpful. If you do not have access to Microsoft Excel, you can use an online version of Googles Sheets for free.
When you become a client of Simon’s, your Sales Representative or a member of our Client Services Department will provide you with one of three Simon’s Placement Forms as part of your onboarding process. You may also download these forms from our website or by clicking one of the following links:
- If you are a health care provider, use the Medical Placements Form
(This would include any health care facility, medical practice, hospital, doctor’s group, etc.)
- If you sell a product or service to consumers, please use the Business to Consumer Placements Form
(This would include any bank, lender, credit union, attorney, retail establishment, publisher, municipality, etc.)
- If your debtors are businesses or sole proprietorships, use the Business to Business Placements Form
(This would include any business-to-business accounts.)
Once you have downloaded one of these placement forms, you may begin to enter your placement information and each template will require you to enter a new file name when you click “save” or “save as” so that you have both your new placement file as well as an original copy of our template you can use again later. This will also help you from making duplicate placements.
For each of these forms the first tab of the sheet is the blank template you would use to fill in each account’s information. You would use one row for each specific bill. So if your patient or customer made three different visits to your office and incurred three different costs for various treatments, you would enter this into the spreadsheet as three separate rows. Many times you can copy a lot of the information from the first row to the subsequent ones. This copied information would be anything that does not change from row to row for the same patient like First Name, Last Name, Address, Phone Number, etc.
The second tab of each of these forms explains what each column is identifying. It is the “key” or “legend” for the first tab, on which you will provide the information for each account you are placing with Simon’s.
While you may not always fill in a value for each column on each record (row) these forms will allow you to provide as much information as you have to Simon’s so that we can make the best possible collection attempts for each of your accounts. For added clarification Row 5 of each sheet contains a sample account entry with values in each field.
The following instructions were included for each of the three sheets in order to make the column descriptions even clearer:
Simon’s Medical Placement Form
Fields Highlighted in Yellow are “Required Fields” and must be populated in order to complete the input process.
Columns B through N reflect the information for the person or company identified as responsible for paying the debt - this is the Guarantor's information.
Columns O and P reflect the information for the patient for which services were rendered or performed (if different than responsible party or guarantor).
Columns U through AC reflect the information for the person identified as a patient guarantor.
Columns AE and AG reflect insurance information.
Simon's Business to Consumer Placements Form
Fields Highlighted in Yellow are “Required Fields” and must be populated in order to complete the input process.
Columns C through O and column R reflect the information for the person identified as responsible for paying the debt - this is the Guarantor's information.
Columns B and P through S provide information regarding the services or products provided to the consumer.
Columns T through AB reflect the information for the person identified as a co-signer/borrower - For rental property, banking clients or co-signer accounts.
Simon's Business to Business Placements Form
Fields Highlighted in Yellow are “Required Fields” and must be populated in order to complete the input process.
Columns E through N and column W reflect the information for the person or company identified as responsible for paying the debt - this is the Guarantor's information.
Columns C, O, P and Q provide information regarding the services or products provided to the customer.
Columns R through U reflect the information for the person who placed the Purchase Order, Authorized the Service, or otherwise provided approval for the services rendered.
Column V reflects whether or not there is a personal signed guarantee from the owner.
Uploading Your Placement File
Once you have completed filling out the Simon’s Placement Form you will save it to your desktop (or network drive, server, etc.) and will navigate to reporting.simonsagency.com. Use the credentials that Simon’s provided to you to login. If you do not have credentials or have not been setup within our Client Access Web portal, please contact your Sales Representative or a member of our Client Services Department.
Once you are logged on, you will select the Uploads tab:

Then click Select (1):

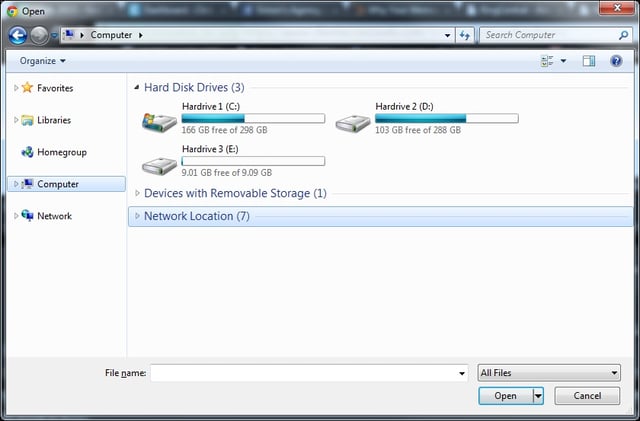
Window explorer will open a navigation dialogue. Browse your computer for the file you want to upload, select it and click “open.”
You may also simply drag a file from your computer onto the screen where you see this:

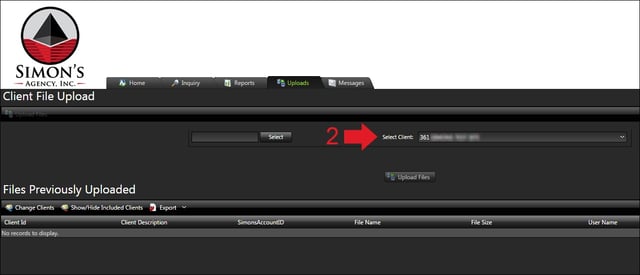
Next you will Select Client (2) using the drop down list. If you have more than one client that you manage you can choose which you are placing accounts for. If you only manage one client, it will be automatically selected as you see here:
You may add additional files for other accounts here as well. You will see a second set of boxes appear once you complete (1) and (2).
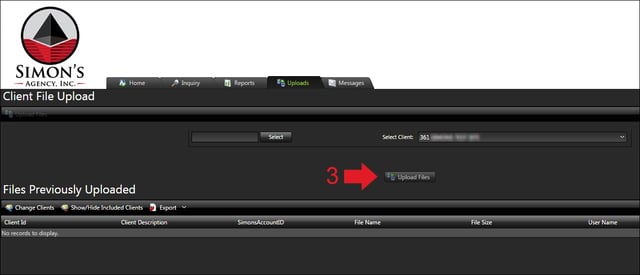
Finally, when you are ready to upload your files, simply click the Upload Files button (3):
You will see an upload completed dialogue and Simon’s Agency will be notified directly of your upload. Once Simon’s processes your new accounts and inputs them into our system you will receive a follow-up confirmation via email from our Client Services Department.
Additionally, you can see files you have previously uploaded on this page as well.
If you have any questions along the way, your Sales Executive or a member of our Client Services Department is ready to assist you at any time.
Download a Printable Version of this Page
Click here to download a printable PDF version of these instructions.